Saturday 19 February 2011
19 febuary
In this lesson we scaled down pictures of our logo set the opacity really low and added text over, this made our links seem more professional and reconizable for our audience and made the website fit instead of clash.
Friday 18 February 2011
18 febuary
Today we worked on our home page, adding text, pictures, slideshows and links. We also sorted out the colour scheme and made sure it was a good visable colour for our audience.
Thursday 17 February 2011
17 febuary
in this lesson we created our pages for the different links on the homepage and the links so it will be more accesible for people to move from page to page.
Wednesday 16 February 2011
16 febuary
In this lesson we thought we would adapt the work Clarity to look like water which we did on photoshop, and using a tutorial. We then loaded the writing on to the eye which we also photoshoped to creat our logo and the enter page picture to our website.

to create this we went on to this link- http://photoshop-dragon.com/Tutorials/Text_Effects/Wet_Text.htm
which we followed the instructions to create our text
here is our step by step guide on how we created Clarity
.
 firstly i opened photoshop and a new project.
 i then went to the handwriting tool, and then in lucinda handwriting font i wrote 'clarity'. i then adjusted the size.
 i then went to layer- rasterize- type, this gives it a slight tilt
 i then went to edit- transform- perspective
 then i went to edit- rotate
 Layer Style. Select Layer->Layer Style->Drop Shadow to bring up the Layer Styles dialog box.
 i then clicked inner shadow and edited then to get my preferable writing.
 i then went to bevel and emboss, adjusted it.
 i ten clicked blending options and changed the levels to get a more suitable outlook.
 To then create the water effect i went too Filter->Distort->Zig Zag which then i adjusted it to give it a little wave.
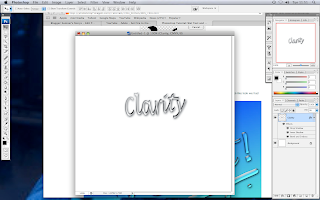 After everything this is how i created the water effect writing.
to create this we went on to this link- http://photoshop-dragon.com/Tutorials/Text_Effects/Wet_Text.htm
which we followed the instructions to create our text
here is our step by step guide on how we created Clarity
.


 After everything this is how i created the water effect writing.
Tuesday 15 February 2011
15 febuary
We had a lot of spare pictures that, and found one that was significant to our website which was an eye, but we photoshoped it to the it was black and white but the iris was a light shade of blue, then we added text over the top to spell our name, Clarity.
Monday 14 February 2011
14 febuary
In this lesson we took out a camera and snapped various different people, then we uploaded them on to computer and edited them using photoshop. in the end we ended up using a few and not all of them
Sunday 13 February 2011
13 febuary
in this lesson we did the remainder of our pages as the site developed we began to this of other ideas that we could add to the sight
Saturday 12 February 2011
12 febuary
in this lesson we played around in 'iweb' looking at different fonts and , font styles that suited our site.
Friday 11 February 2011
11 febuary
in lesson we starting buliding our webiste on 'Iweb' we set up the page with the correct widths and heights on the page layout.
Thursday 10 February 2011
10th febuary
in this lesson we drew up sketches for our website 'Clarity' which will help us figure out what goes where, when building our website.
Wednesday 9 February 2011
9th febuary
we made a survey for 30 random people to find out what audience is for this website. we got a different variety of feedback which gave us a clear idea on who to aim this for.
Tuesday 8 February 2011
8th febuary
we looked at different sites to get an idea for ours, we decided of making a webiste dedicated to blind people. We looked at various webistes and we saw what looks good and bad and we are going to be taking what we learnt and using it for our own website.
Saturday 5 February 2011
5th febuary
We was going through ideas for our next website, charity website, we was looking at different charity websites to get an idea of what to do.
Friday 4 February 2011
4th frebuary
in this lesson i touched up my website to make it more orginal to others and added a logo to my background which is faded.
Thursday 3 February 2011
3rd febuary
In this lesson i followed my designs and made my school site added a video which i took in the previous lesson i also edited it aswell.
Wednesday 2 February 2011
2nd febuary
In this lesson i booked a camera out and went around school taking photos, of which i uploaded and edited to go on to my school sight.
Tuesday 1 February 2011
1st Febuary
In this lesson i drew my premilary website on paper to construct on what i was going to do on the computers when coming to make my school website.
Subscribe to:
Posts (Atom)