In this lesson we thought we would adapt the work Clarity to look like water which we did on photoshop, and using a tutorial. We then loaded the writing on to the eye which we also photoshoped to creat our logo and the enter page picture to our website.
to create this we went on to this link- http://photoshop-dragon.com/Tutorials/Text_Effects/Wet_Text.htm
which we followed the instructions to create our text
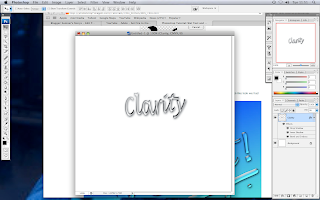
here is our step by step guide on how we created Clarity
.
firstly i opened photoshop and a new project.
i then went to the handwriting tool, and then in lucinda handwriting font i wrote 'clarity'. i then adjusted the size.
i then went to layer- rasterize- type, this gives it a slight tilt
i then went to edit- transform- perspective
then i went to edit- rotate
Layer Style. Select Layer->Layer Style->Drop Shadow to bring up the Layer Styles dialog box.
i then clicked inner shadow and edited then to get my preferable writing.
i then went to bevel and emboss, adjusted it.
i ten clicked blending options and changed the levels to get a more suitable outlook.
To then create the water effect i went too Filter->Distort->Zig Zag which then i adjusted it to give it a little wave.
After everything this is how i created the water effect writing.


No comments:
Post a Comment